Bicycle Seat Installation Guide: Height, Angle, and Position Explained

Installing a bicycle seat may seem like a simple task, but doing it correctly can make a huge difference in your comfort, safety, and riding performance. A properly installed saddle helps reduce pressure on your back, knees, and hips while improving pedaling efficiency and bike control.
Whether you’re replacing a worn-out saddle, upgrading to a more comfortable seat, or setting up a new bike, understanding how to install and adjust a bicycle seat is essential. The process involves more than just tightening a few bolts—you also need to set the correct seat height, angle, and fore-and-aft position to match your riding style and body measurements.
In this guide, you’ll learn how to install a bicycle seat step by step, what tools you’ll need, common mistakes to avoid, and how to make final adjustments for the most comfortable riding experience.
How Do You Install a Bicycle Seat?

Installing a bicycle seat is a straightforward process that most riders can complete in less than 15 minutes. The key is ensuring the saddle is mounted securely and adjusted correctly before riding. Following the proper installation steps will help prevent discomfort, poor riding posture, and potential safety issues.
Gather the Required Tools
Before starting, make sure you have the tools needed for the installation. Most modern bicycles require only a few basic tools to remove and install a saddle.
Common tools you’ll need:
- Allen keys or hex wrenches
- Torque wrench (recommended)
- Socket wrench (for some seatpost designs)
- Clean cloth
- Bicycle grease (optional)
Having the right tools ready before you begin makes the installation process faster and helps prevent damage to bolts and components.
Remove the Old Bicycle Seat
If you’re replacing an existing saddle, begin by loosening the saddle clamp bolts located beneath the seat. Use the appropriate Allen key or wrench to loosen the hardware gradually.
Once the clamp is loose enough, slide the saddle rails out of the seatpost clamp and carefully remove the old seat. Take a moment to inspect the clamp and seatpost for dirt, rust, or signs of wear. Cleaning these parts before installing the new saddle can improve stability and prevent future issues.
Attach the New Saddle to the Seatpost
Position the new saddle so the rails sit evenly within the seatpost clamp. Most saddles feature two metal rails underneath that fit securely into the clamp mechanism.
Align the saddle so it sits approximately level and centered. Avoid placing the saddle too far forward or backward at this stage since you’ll make final adjustments later.
The saddle rails should sit securely within the clamp grooves without twisting or shifting. Proper alignment now will make the final setup much easier.
Tighten the Clamp and Test Stability
Once the saddle is positioned correctly, tighten the clamp bolts gradually and evenly. If your seatpost uses two bolts, alternate between them to maintain equal pressure across the saddle rails.
After tightening, hold the saddle firmly and attempt to move it from side to side. There should be no noticeable movement. If the saddle shifts, tighten the bolts slightly more while staying within the manufacturer’s recommended torque specifications.
A secure saddle is essential for both safety and comfort, so always double-check stability before riding.
What Tools Do You Need to Install a Bicycle Seat?
Most bicycle saddle installations require only a few simple tools. The exact tools depend on your bike’s seatpost design, but having the proper equipment helps ensure a safe and professional installation.
Allen Keys and Hex Wrenches
Allen keys are the most commonly used tools for bicycle seat installation. Most saddle clamp bolts use metric hex fittings, typically ranging from 4mm to 6mm.
These tools allow you to loosen and tighten the clamp bolts securely without damaging the hardware. A quality set of Allen keys is one of the most important tools for any cyclist.
Torque Wrench for Proper Tightening
A torque wrench helps ensure bolts are tightened to the manufacturer’s recommended specifications. This is especially important for modern bikes with lightweight aluminum or carbon fiber components.
Benefits of using a torque wrench:
- Prevents over-tightening
- Protects carbon fiber components
- Improves saddle security
- Reduces the risk of bolt damage
- Ensures manufacturer compliance
Although not always required, a torque wrench is highly recommended for accurate installation.
Bike Repair Stand (Optional)
A bicycle repair stand is not necessary but can make the job much easier. Holding the bike at a comfortable working height allows you to access the saddle and seatpost without bending or balancing the bicycle.
Repair stands are particularly useful when making multiple adjustments to saddle height, angle, and position.
Cleaning Supplies for Maintenance
Before installing a new saddle, it’s a good idea to clean the seatpost clamp and surrounding components. Dirt and debris can affect how securely the saddle mounts and may cause unwanted movement over time.
A clean cloth, mild bike cleaner, and small brush are usually sufficient for preparing the installation area and keeping components in good condition.
How Do You Remove an Old Bicycle Seat?
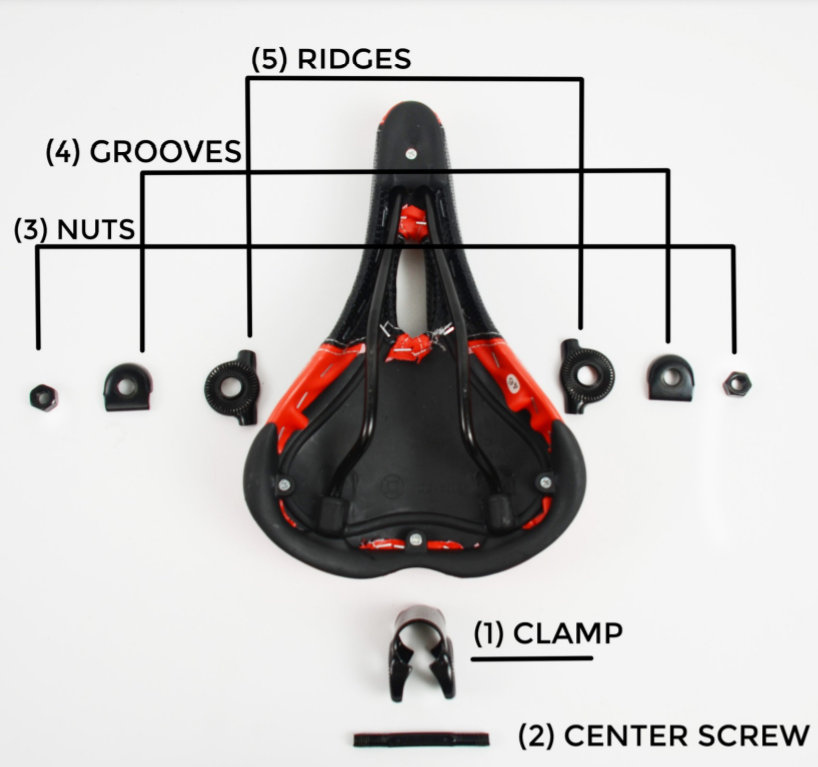
Before installing a new saddle, you’ll need to remove the old one correctly. Taking a few minutes to remove the seat carefully can prevent damage to the seatpost clamp and make the installation process much smoother.
Locate the Saddle Clamp Bolts
The saddle is attached to the bike through a clamp located at the top of the seatpost. Depending on your bicycle, the clamp may use one or two bolts to secure the saddle rails.
Look underneath the saddle to identify the bolt configuration and determine which tool you’ll need for removal.
Loosen the Clamp Safely
Use the correct Allen key or wrench to loosen the clamp bolts gradually. Avoid removing one bolt completely before loosening the other, as this can place uneven pressure on the clamp components.
Turn the bolts counterclockwise until the saddle rails become loose enough to slide free.
Slide the Saddle Rails Out
Once the clamp is loose, carefully slide the saddle rails out of the mounting bracket. Keep any washers, bolts, or clamp pieces together so they don’t get misplaced during installation.
Take note of the previous saddle position if you want to replicate a similar setup with the new seat.
Inspect the Seatpost Before Reinstallation
Before installing the new saddle, inspect the seatpost clamp for signs of wear or damage.
Things to check include:
- Cracked clamp components
- Rust or corrosion
- Stripped bolt threads
- Bent saddle rails
- Excessive dirt buildup
Replacing worn parts now can help prevent future problems and improve riding safety.
How Do You Attach a New Bicycle Saddle?
Align the Saddle Rails Correctly
Most bicycle saddles have two rails running underneath the seat. These rails fit into the seatpost clamp and allow adjustments for saddle angle and fore-aft positioning.
Place the rails evenly into the clamp grooves, ensuring both sides sit securely and symmetrically.
Position the Rails in the Clamp
The saddle should initially be positioned near the center of the rails. This neutral starting point makes it easier to fine-tune the riding position later.
Make sure the saddle is aligned with the bike frame and not pointing slightly left or right. Even a small misalignment can affect riding comfort.
Tighten the Saddle Evenly
Tighten the clamp bolts gradually and evenly. If your seatpost uses two bolts, alternate between them to maintain balanced pressure.
Avoid tightening one side fully before the other. Uneven tightening can damage the saddle rails or cause the seat to shift during riding.
Check for Saddle Movement
After tightening the bolts, grasp the saddle firmly and attempt to move it.
A properly installed bicycle saddle should:
- Remain stable under pressure
- Stay aligned with the frame
- Show no side-to-side movement
- Maintain its angle when weight is applied
- Meet the recommended torque setting
If movement is detected, recheck the clamp tension and alignment.
How High Should a Bicycle Seat Be?
Proper saddle height is one of the most important adjustments you can make on a bicycle. An incorrect seat height can reduce pedaling efficiency and cause discomfort in your knees, hips, and lower back.
The Heel-on-Pedal Method
One of the easiest ways to determine saddle height is the heel-on-pedal method.
Sit on the bicycle and place your heel on the pedal at its lowest point. Your leg should be nearly straight without your hips rocking from side to side. When riding normally with the ball of your foot on the pedal, this creates a slight bend in the knee.
Knee Bend Position Explained
Most bike fitting experts recommend maintaining a slight knee bend at the bottom of each pedal stroke. This position provides efficient power transfer while reducing stress on the joints.
A small bend allows the leg muscles to work effectively throughout the pedaling motion.
Signs Your Seat Is Too High
When a saddle is too high, several problems can occur.
Common symptoms include:
- Hips rocking while pedaling
- Lower back discomfort
- Difficulty reaching the pedals
- Reduced bike control
- Hamstring strain
Lowering the saddle slightly can often solve these issues.
Signs Your Seat Is Too Low
A saddle that sits too low can also affect comfort and efficiency.
You may notice:
- Knee pain during rides
- Reduced pedaling power
- Excessive bending of the knees
- Fatigue during longer rides
- Less efficient pedal strokes
Raising the seat gradually can help improve performance and comfort.
What Is the Best Bicycle Seat Angle?
The angle of your bicycle saddle plays a major role in comfort. Even small adjustments can significantly affect pressure distribution and riding posture.
Why a Level Saddle Works Best
For most riders, a level saddle provides the best balance between comfort and support. It helps distribute body weight evenly and prevents excessive pressure on sensitive areas.
Many bike fitters recommend starting with a perfectly level saddle and making small adjustments from there if necessary.
When to Tilt the Saddle Forward
A slight forward tilt may help riders who experience pressure in the front of the saddle or discomfort during long rides.
However, excessive forward tilt can cause the rider to slide forward and place extra strain on the hands, wrists, and shoulders.
When to Tilt the Saddle Backward
Some cyclists prefer a slight rearward tilt to increase support. This adjustment can improve comfort for certain riding styles but should be made cautiously.
Too much rearward tilt may create excessive pressure and limit efficient pedaling movement.
Common Saddle Angle Mistakes
Many comfort problems result from incorrect saddle angles.
Avoid these common mistakes:
- Tilting the saddle excessively forward
- Tilting the saddle excessively backward
- Making large adjustments at once
- Ignoring discomfort signals
- Failing to test changes during rides
Small adjustments followed by short test rides usually produce the best results.
How Do You Adjust Saddle Fore-and-Aft Position?
The fore-and-aft position refers to how far forward or backward the saddle sits on its rails. This adjustment affects your riding posture, pedaling efficiency, and overall comfort. Even a small change can make a noticeable difference during longer rides.
What Is Saddle Setback?
Saddle setback is the horizontal distance between the saddle and the bike’s bottom bracket. Adjusting the saddle forward or backward changes how your body weight is distributed and how efficiently you pedal.
A proper setback position helps maintain balance, comfort, and power output while riding.
Finding the Correct Knee Position
Many cyclists use the Knee Over Pedal Spindle (KOPS) method as a starting point for saddle positioning. When the pedals are level, the front of your knee should align roughly over the pedal axle.
While this isn’t a strict rule for every rider, it provides a useful baseline for setting saddle position.
Improving Comfort and Power Transfer
A properly adjusted saddle position helps:
- Improve pedaling efficiency
- Reduce knee strain
- Enhance climbing performance
- Increase riding comfort
- Improve weight distribution
- Reduce lower back fatigue
Finding the right position often requires small adjustments followed by test rides.
Testing Your Riding Position
After adjusting the saddle, take a short ride and pay attention to how your body feels.
If you feel stretched out, the saddle may be too far back. If you feel cramped or place too much weight on your hands, the saddle may be too far forward. Make small changes until you find the most comfortable position.
What Are the Most Common Bicycle Seat Installation Mistakes?
Even a simple saddle installation can lead to problems if certain mistakes are overlooked. Understanding these common errors can help you achieve a safer and more comfortable setup.
Over-Tightening the Saddle Clamp
One of the most common mistakes is tightening saddle bolts too much. Excessive force can damage saddle rails, strip bolt threads, or crack lightweight components.
Always follow the manufacturer’s recommended torque specifications whenever possible.
Incorrect Saddle Height
Many cyclists ride with their saddle either too high or too low. An incorrect seat height can reduce efficiency and cause discomfort in the knees, hips, and lower back.
Taking time to adjust saddle height properly can significantly improve your riding experience.
Poor Saddle Angle Adjustment
An excessively tilted saddle often creates pressure points and discomfort. Small angle adjustments are usually all that’s needed to improve comfort.
Most riders achieve the best results with a nearly level saddle position.
Ignoring Manufacturer Torque Settings
Modern bicycle components are designed with specific torque requirements. Ignoring these recommendations can result in loose components or damaged hardware.
Why torque settings matter:
- Prevent component damage
- Improve riding safety
- Reduce bolt wear
- Ensure secure installation
- Protect carbon fiber parts
A torque wrench is one of the best tools for preventing installation errors.
How Can You Tell if Your Bicycle Seat Is Installed Correctly?

Once the installation is complete, it’s important to verify that everything is secure and adjusted properly before heading out for a long ride.
Perform a Visual Inspection
Start by checking that the saddle is centered and aligned with the bicycle frame. Look for uneven rail positioning, loose bolts, or visible damage.
A quick inspection can often reveal issues before they become problems on the road.
Check Saddle Stability
Hold the saddle firmly and try moving it from side to side and up and down.
A properly installed saddle should:
- Remain firmly in place
- Show no excessive movement
- Maintain its angle
- Stay centered on the bike
- Feel secure under pressure
If movement occurs, recheck the clamp bolts and torque settings.
Take a Short Test Ride
A short test ride is one of the best ways to evaluate your saddle setup. Pay attention to comfort, posture, and pedaling efficiency.
Notice whether you feel balanced on the bike and whether any pressure points develop during the ride.
Make Final Comfort Adjustments
Few cyclists achieve the perfect saddle position on the first attempt. Small adjustments to saddle height, angle, and setback are normal.
Make one adjustment at a time and test each change before making additional modifications. This approach helps identify which adjustment improves comfort and performance.
Can You Install Any Bicycle Seat on Any Bike?
Many cyclists wonder whether bicycle saddles are universal. While most modern saddles fit a wide range of bikes, compatibility depends on several factors.
Understanding Saddle Rail Compatibility
Most bicycle saddles use standard metal rails that fit common seatpost clamp designs. However, some high-performance saddles use oversized carbon rails that require specific clamp systems.
Always check rail dimensions before purchasing a replacement saddle.
Seatpost Clamp Types Explained
Different bicycles use different saddle clamp designs. Single-bolt, dual-bolt, and integrated clamp systems all secure saddles differently.
Understanding your seatpost type can help ensure compatibility when choosing a new saddle.
Road Bike vs Mountain Bike Saddles
Road bike saddles are typically narrower and designed for efficient pedaling, while mountain bike saddles often provide additional durability and support for rough terrain.
Although many saddles can be used interchangeably, selecting one designed for your riding style usually improves comfort.
When You Need an Adapter
Some specialty saddles or carbon rail systems require adapter hardware to fit standard seatposts.
You may need an adapter if:
- The saddle uses oversized carbon rails
- The seatpost clamp is non-standard
- The manufacturer specifies additional hardware
- The rail shape differs from standard designs
Checking compatibility before installation can save time and prevent frustration.
How Often Should You Check Your Bicycle Seat?
A properly installed bicycle seat can gradually shift over time due to regular riding, vibrations, rough terrain, and weather conditions. Regular inspections help ensure your saddle remains secure, comfortable, and correctly positioned.
Before Long Rides
Before heading out on a long-distance ride, take a few minutes to inspect your bicycle seat. Check that all bolts remain tight and that the saddle hasn’t shifted from its original position.
A quick pre-ride inspection can help prevent discomfort and mechanical issues during your ride.
After Crashes or Impacts
Any crash, fall, or significant impact can affect saddle alignment. Even if no visible damage is present, it’s important to inspect the seatpost clamp and saddle rails for movement or wear.
After an impact, check for:
- Loose saddle bolts
- Bent saddle rails
- Cracked clamp components
- Changes in saddle angle
- Unexpected seat movement
Addressing these issues immediately helps maintain rider safety.
During Regular Bike Maintenance
The bicycle saddle should be included in your routine maintenance schedule. Whenever you clean, lubricate, or inspect your bike, take a moment to verify the saddle remains properly adjusted.
Regular maintenance helps identify small problems before they become larger repairs.
Signs the Saddle Needs Readjustment
Over time, your riding position may change due to fitness improvements, new cycling goals, or discomfort experienced during rides.
Common signs that your saddle may need adjustment include:
- Knee pain while riding
- Lower back discomfort
- Numbness or pressure points
- Reduced pedaling efficiency
- Difficulty maintaining a comfortable position
Making small adjustments can often resolve these issues and improve overall riding comfort.
Frequently Asked Questions
How do I install a bicycle seat for the first time?
To install a bicycle seat, remove the old saddle if necessary, place the new saddle rails into the seatpost clamp, tighten the clamp bolts evenly, and adjust the height, angle, and position before taking a test ride.
What tools do I need to install a bicycle seat?
Most bicycle seats can be installed using an Allen key or hex wrench. Some bikes may require a socket wrench, while a torque wrench is recommended for tightening bolts to the manufacturer’s specifications.
How tight should a bicycle seat be?
A bicycle seat should be tight enough that it does not move during riding. Follow the torque specification recommended by the saddle or seatpost manufacturer to avoid over-tightening and damaging components.
How do I know if my bicycle seat is the correct height?
A common method is to place your heel on the pedal at its lowest position. Your leg should be almost fully extended without your hips rocking from side to side while pedaling.
What is the best angle for a bicycle saddle?
For most riders, a level saddle position works best. Small adjustments may improve comfort, but extreme upward or downward tilts can cause discomfort and reduce pedaling efficiency.
Can I install any bicycle seat on my bike?
Most modern bicycle saddles use standard rails and fit most seatpost clamps. However, it’s important to check compatibility between the saddle rails and your bike’s seatpost system.
Why does my bicycle seat keep slipping?
A slipping bicycle seat is usually caused by loose clamp bolts, worn seatpost components, or incorrect torque settings. Tightening the bolts properly often solves the issue.
How often should I check my bicycle seat adjustment?
It’s a good idea to inspect your saddle position and bolt tightness regularly, especially before long rides or after transporting your bike, riding on rough terrain, or experiencing a crash.
Conclusion
Installing a bicycle seat is a straightforward bike maintenance task that most cyclists can complete in just a few minutes. By correctly mounting the saddle, adjusting the seat height, setting the proper angle, and positioning it correctly on the rails, you can significantly improve comfort, efficiency, and overall riding enjoyment.
Taking the time to fine-tune your saddle setup can help prevent discomfort, reduce the risk of injury, and make every ride more enjoyable. Before heading out, always double-check that the saddle is secure and stable. With the right installation and adjustments, your bicycle seat will provide the support and comfort you need for both short commutes and long-distance rides.

- Top 10 Best Helmet For A Running Back 2026 - September 16, 2026
- Best Bug Remover For Car Wash 2026 - September 16, 2026
- Best Bug And Bird Poop Remover For Cars 2026 - September 15, 2026